Category Configure your Raspberry to do more!

Raspberry PI in displayless mode…

I recently got a question about if Z-LiveRec could be used on Raspberry PI but without a screen or monitor. (Headlessmode) The idea from the user was to be able to remote control Z-LiveRec running on Raspberry using a RealVNC terminal window (which is built in Raspberry)

So the challenge was to create a Raspberry PI to boot up, logging in to the pre-defined WI-FI network and create a remote server session which any device on the same WI-FI network could to attach to.

I liked the idea – so I had to try it out!

I first installed a Raspberry PI and also Z-LiveRec and got it working, using a hdmi screen attached. I have a post for this exactly how to make a nice Raspberian installation for Z-LiveRec in this linked post. I had both DL32S and XR18 built in WI-FI on my target list for these tests. I tried first to attach to the terminal session by using XR18s built in Wi-Fi network. I was of course able to attach to the network from my iPad running x-air and also from the Raspberry PI. (The multichannel recording handled by Z-LiveRec is going over USB to XR18)

But after many attempts trying run the VNC client on my iPad…it was totally impossible to get XR18S built Wi-Fi network to route/forward any other network information than just the X-Air network information – which have been said using port 10024. (It does not route/handle port number 5900 as VNC is using) – and you also have a limit on max 4 devices on the built in XR18 Wi-Fi. So the conclusion was if you want to use VNC against a Raspberry PI forget the XR18 internal wifi – it is not possible.

Ok, I changed to a external router and BAM!!! The VNC session showed up and worked immediately!

So was now able to start Z-LiveRec in a VNC session from my iPad.

I have made the same tests on my Mackie DL32S…and here the internal router forwards all ports – so on this mixer the internal Wi-Fi can be used – but is not recommended…always use an external router when out on gigs!

To create a system which will auto start a VNC Server Session, the following tasks needs to be done.

Edit the rc.local file by typing:

sudo nano /etc/rc.local

Insert the following line, just before the exit 0 line.

sudo -u pi vncserver -randr=1280x720

You can check if VNC Server is installed…by typing VNCSERVER. You will also see which IP address is used.

VNCSERVER

Note: You actually don’t need to enable VNC in the PI configuration hardware…the auto startup will take care about this. (If you also enable it in the configuration…dual VNC sessions will be created – eating more resources.

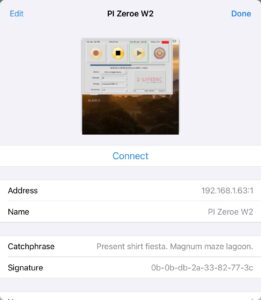
Now you can run the VNC Client on your iPad and attach to the Raspberry PI – 192.168.1.xx:1

The login screen in VNC on a ipad.

Check your username and password.

It normally takes about 30 seconds for the system to boot up.

If you have trouble with cannot currently show desktop messages…set the screen resolution to 1280×720 with sudo raspi-config command and choose display options.

Conclusion – you can indeed use a Raspberry PI in headless mode/black box – and run Z-LiveRec remotely from any network device that is supported by VNC. (You need to have done the homework with all settings for the mixer wifi…but after this – it will work just as good as with a touch display.

Use Raspberry PI to Route Spotify over USB to your Behringer XR18 or Mackie DL Series mixer

A common task when doing concerts is to have pause music during the gig breaks – and of course “YES” you can always have an extra iPhone or computer running with Spotify installed and use two analog inputs on your mixer. (Simple!) – But to raise the bar slightly and make something a little bit more advanced – I came up with the following solution as a spin-off when researching and developed the USB multi-track recorder Z-LiveRec for mixers like Behringer XR18 and Mackie DL16/32S and using a Raspberry PI as the heart. 🙂

Multi-tracks over USB 2 or 3 is a fantastic idea, which is used by most mixer vendors on the market. You can both send and receive up to 16 or 32 or even 64 tracks (dependent on your hardware) at the same time. So there is some scenarios which you can use here. One common is to utilize plug-in effects in a DAW tool like a cool echo or reverb…and address it as a effect on your DL32S, send it to a Mac over USB to the DAW/plug-in and immediately get the signal back over USB to your mixer again. See the video recording describing this on the following link.

For Raspberry PI there is a Spotify Connect Client called Raspotify available which can be used as extension adding an extra sound device on the network seen from any of your PC, Mac, Iphone running Spotify client etc. Simply – you are able to tell Spotify to send the music to your Raspberry device and then use the headphone output etc to hear the music. In this case your PC/iPhone/iPad etc controls the music…and the Raspberry just executes the task and playing the music stream. Benefit received: You could stand in the audience and trigger the music from your iPad running Master Fader and the Spotify client wirelessly!

But to use two analog inputs connected to your Raspberry PI on your mixer to play this digital stream feels in this case feels a bit annoying. (Especially for me which is using my DL32S to record and play 32 channels over USB using the Z-LiveRec App.)

However, I found the following scenario which enable me to use the Raspberry PI to also send the Raspotify music stream over USB to my mixer. So the Spotify music stream is now been sent to return channel 1&2 on my mixers (Behringer XR18 or DL16/32S or DL32R mixer)

To configure a Raspberry PI to handle this you need to do two steps:
a) Install the Raspotify Client,
b) Configure Raspberry to send the information further over USB to your mixer.

So lets get down to business – how to do it?

  1. After connecting your mixer via USB to the raspberry PI.
aplay -l

Run the command “aplay -l” in a terminal window on your Raspberry PI and look for the USB Card number for your mixer. (e.g. 1 or 2 – this could differ when running on a hdmi screen when doing the configuration – until running on a 3.5″ touch screen)

2. Execute the command in a terminal window on your Raspberry:

sudo nano /usr/share/alsa/alsa.conf

Look for the lines: (A couple of pages down)

"defaults.ctl.card 0"
"defaults.pcm.card 0"


Change these from 0 to your Card number from what is reported by "aplay"
"defaults.ctl.card 1"
"defaults.pcm.card 1"

Save the file by pressing CTRL X - press Yes...and then return to save. 

3. Install the Raspotify Client: (In a terminal window on your Raspberry PI)


curl -sL https://dtcooper.github.io/raspotify/install.sh | sh

4. Now, edit the Raspotify configuration file (Set in your parameters and uncomment some configuration in this file)

sudo nano /etc/default/raspotify

DEVICE_NAME="Mackie DL32S"
BITRATE="320"
OPTIONS="--username <your_spotify_name> --password <xxxxx>"
BACKEND_ARGS="--backend also"

Save the file by pressing CTRL X - press Yes...and then return to save. 

5. Now, patch the asound.conf file (This file may not exist – so nano editor will create it. Please note that you need change the CARD=X to your mixer environment reported by aplay on step #1.

sudo nano /etc/asound.conf

pcm.!default{
type asym
playback.pcm {
type plug
slave.pcm "dmix:CARD=1,RATE=48000"
}
}

Save the file by pressing CTRL X - press Yes...and then return to save. 

6. Last – do a reboot of your Raspberry!

The Raspberry needs to be on the same network as your mixer (Either over ethernet or via WI-FI) – The whole network needs to have access to internet to get the music stream and the Spotify Connect run.

But you will now be able to see your DL-32S in the Spotify application as a device from your PC/Mac/Iphone/iPad and if you hit play…the Rasberry will start to play music and send it over USB port 1&2 to your mixer…to be recieved on the Return channel 1&2 on your mixer.

Pretty neat? 🙂